
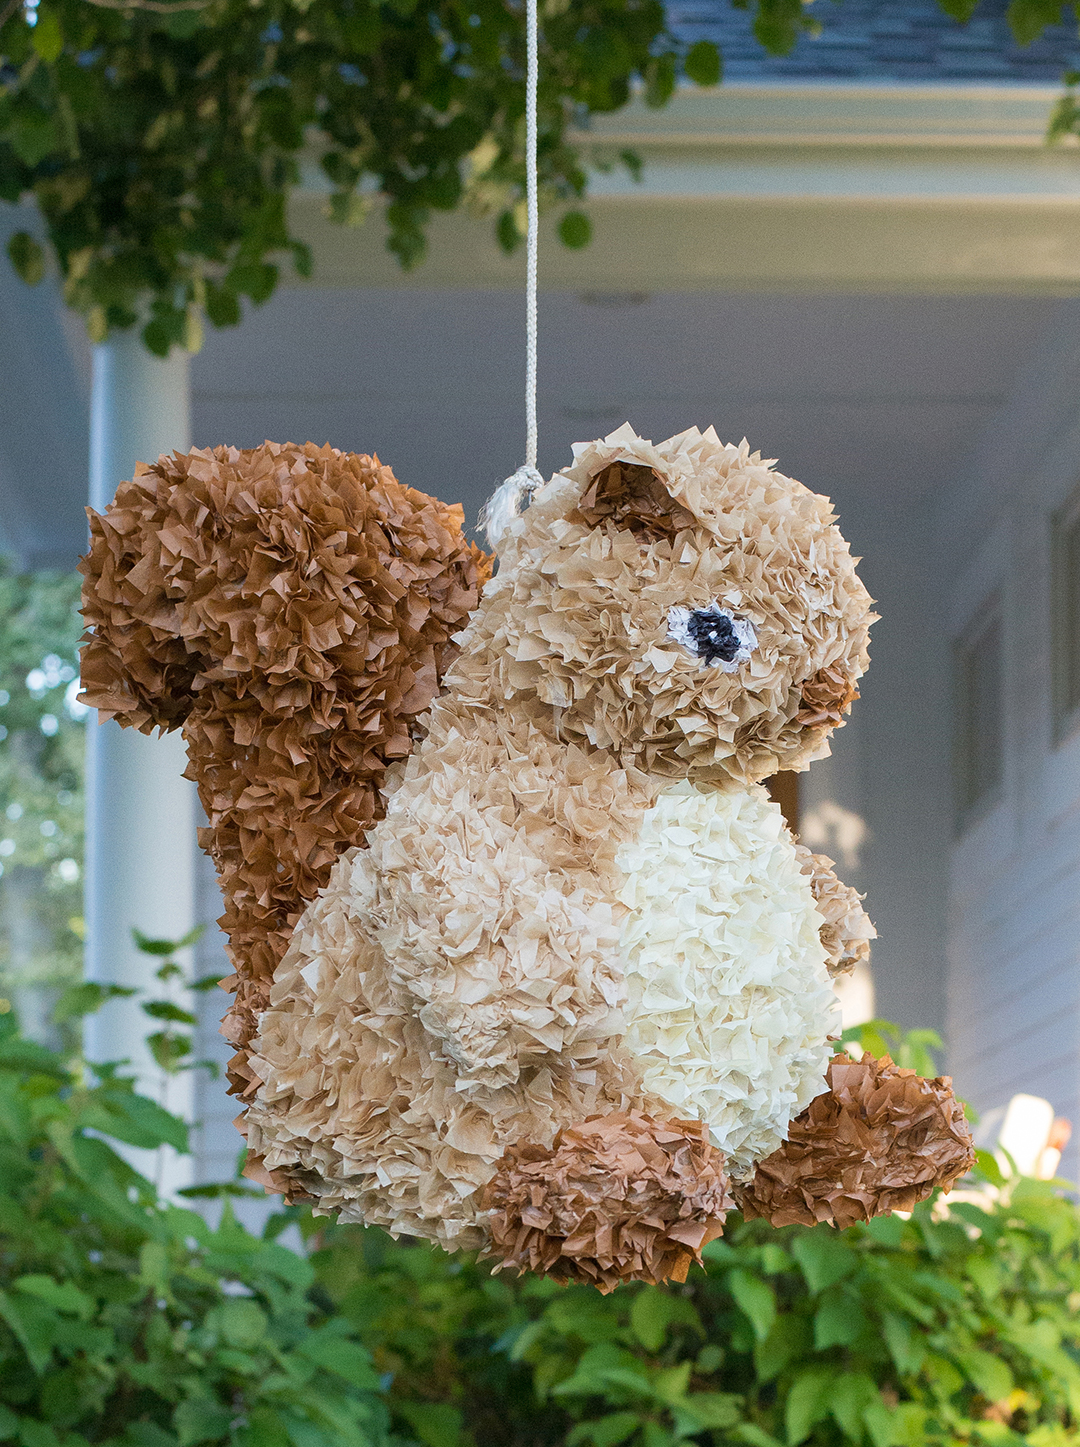
Murphy’s birthday is coming up, so I made him a squirrel piñata. Doesn’t everyone make piñatas for their dog? OK, it was a prop for a photo shoot, but I had a lot of fun making it. It was the first piñata I’ve made since New Year’s Eve 1999. I remember that one well. It was Times Square-themed to ring in Y2K. At our New Year’s party, the kids decorated the piñata, and we dropped it off the garage roof at midnight. Super messy and super fun! Since it had been a while since my last paper mache attempt, I brushed up on piñata making basics and added a few touches of my own.
These are the materials I used:
Two 8-inch balloons – One fully inflated balloon for the body and one less inflated balloon for the head.
Packing air cushions – Similar to bubble wrap but much larger. They look like horizontal balloons and are used for packing fragile items.
Recycled cardboard for tail, ears & feet
Masking tape
Scissors
Newspaper – Cut into strips
Flour paste – Mix 1 part flour to 2 parts water.
Glue
Tissue paper
Piece of wire
Dry wall screw – for attaching wire to piñata when original wire mount wasn’t strong enough
Rope to hang it

Step 1: Create the squirrel structure. Balloons are perfect for the body. The packing bubbles that Amazon uses to cushion packages make great arms. They come perforated together in long strips, so I also wrapped them around a piece of curved cardboard to form a bushy tail. Everyone knows fat squirrels are cuter, so I draped the air cushions around the squirrel’s belly to give him a little girth. I used cardboard for the ears and frozen yogurt cups for the feet. Masking tape worked great to stick everything together. It wasn’t pretty, but it was about to be covered in soggy newspaper strips.
Step 2: Make the paper mache paste. It’s simple but messy, so cover your table with newspaper first. Use 1 part flour to 2 parts water. Whisk the flour and water together until it is pancake batter consistency. If you live in an area with high humidity, add a few tablespoons of salt to help prevent mold. Dip the newspaper strips in the paste and place them on the balloon. My dog, Murphy, was very curious about this process. He tried to lick the wet paper mache. Yummy.
Step 3: Let it dry. After the piñata is covered with a few layers of paper mache, wait a few days for it to dry. After the paper mache dries, pop the balloons so there will be a hollow space to hold treats. If you plan on filling the piñata with treats, cut a trap door on the back so you can stuff treats in later. If this were filled with dog treats, it would make a fun piñata for a dog birthday party!

Step 4: Time to decorate. Cut 1-inch squares of tissue paper in various colors. Spread glue on a small area of the piñata. Hold the four corners of the tissue paper square together and stick the center of the tissue paper square onto the glue. Any kind of glue works. At first, I used Elmer’s glue, but then I switched to flour and water paste. Both worked fine, but I learned the hard way that if you use too much glue it leaks through the tissue, especially on the darker colors. Decorating took f-o-r-e-v-e-r because each tiny piece of tissue only filled up 1/4 inch of space. My dog was a bit spooked once the piñata finally started looking like a squirrel. After I put the eyes on, he growled at it until I put it away. He’s not the brightest dog sometimes.
Step 5: Party time! Use the trap door to fill it with candy, treats, and prizes. Hang the piñata from a tree and swat at it with a stick! Murphy loves sticks, so he volunteered to demonstrate proper piñata-hitting form. Normally, you blindfold the person with the stick, but since Murphy is a dog, I figured that would be mean.

Truth be told, Murphy was much more interested in the big stick than the piñata. I’m sure my nephews would enjoy making and smashing a piñata much more than Murphy did. If you do this project with kids, I’d recommend decorating with fringed strips of crepe paper or painting the piñata to make it easier. Don’t be as much of a perfectionist as I was because you are probably going to smash the piñata to bits. That’s the whole point of it!
You can purchase birthday cards with this image in my Etsy shop.
About Karen Hoglund Photography
About the photographer: Karen Hoglund is a professional pet photographer based in Denver, CO. She specializes in dog and cat portraits that are works of art for your home. Each photoshoot is created uniquely around your pet’s needs so they’ll feel at ease. For more information, please call 720-238-3337, visit Karen’s portfolio and follow Karen on Facebook or Instagram.
